Been making stuff again. This is actually one of the simplest things EVER, and could easily be a child’s craft. It literally took five minutes to do the basics of this thing. It would take a child longer, and you’d have to do the glue gun part, but still…really simple.
Supplies:
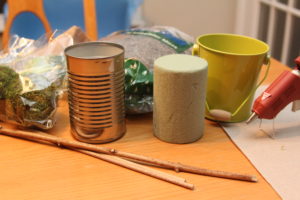
- Tin can (or some other small roundish container…see the little green bucket got that for a $1.00)
- Mug plug (floral foam, comes in packs of two)
- Stick or Wooden dowel (The stick came from the yard and the dowel was a leftover piece after making kites)
- Moss ball (this came in a four pack and is probably the smallest they make. I would do a larger size next time)
- Spanish moss (comes in a bag in the wedding and floral sections of the craft store)
- Glue gun and glue sticks
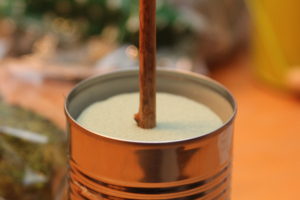
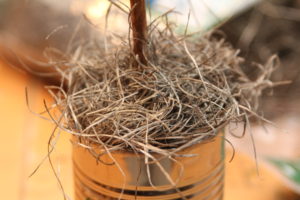
The first thing I did was glue the mug plug into the can. In hindsight…I should have done this later…so lets move on.
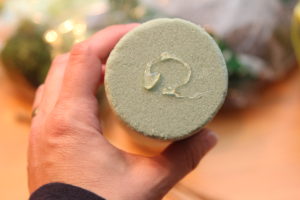
The first thing I SHOULD have done was puncture the moss ball with the stick and make sure I could get it in there. So…
Step 1: Puncture moss ball with stick
Step 2: Pull the stick back out, put a dab of glue on the end and stick it back in there for good.
Step 3: Put a dab of glue on the other end of the stick and push it into the center of the mug plug. (Ignore the fact that this is already in the can. Do as I say…not as I do. Trust me.
Step 4: THEN…put some glue on the bottom of the mug plug and place it into the can. There.
Step 5: Grab a scraggly little handful of Spanish moss and shape it around your stick until you think it looks awesome. Then pull it up carefully, it kind of holds it’s shape, and spread some glue around under it on top of the mug plug. Then press it back down. This is not going to keep all the moss in place, but it will keep it from flying away. At this point your basic topiary is done.
Step 6: Run a strip of glue up the side of the tin can and stick one end of your burlap piece to it to hold it in place. Wrap it around the can and run another strip of glue to hold the other side. The little bit of overlap will be loose, but that makes it look more natural, don’t you think?
Step 7: Wrap a strip of your favorite calico print around it (twice if you have enough) and tie a little knot to keep the ends together. This holds the burlap flap down and if you tie it tight enough you won’t need any glue.
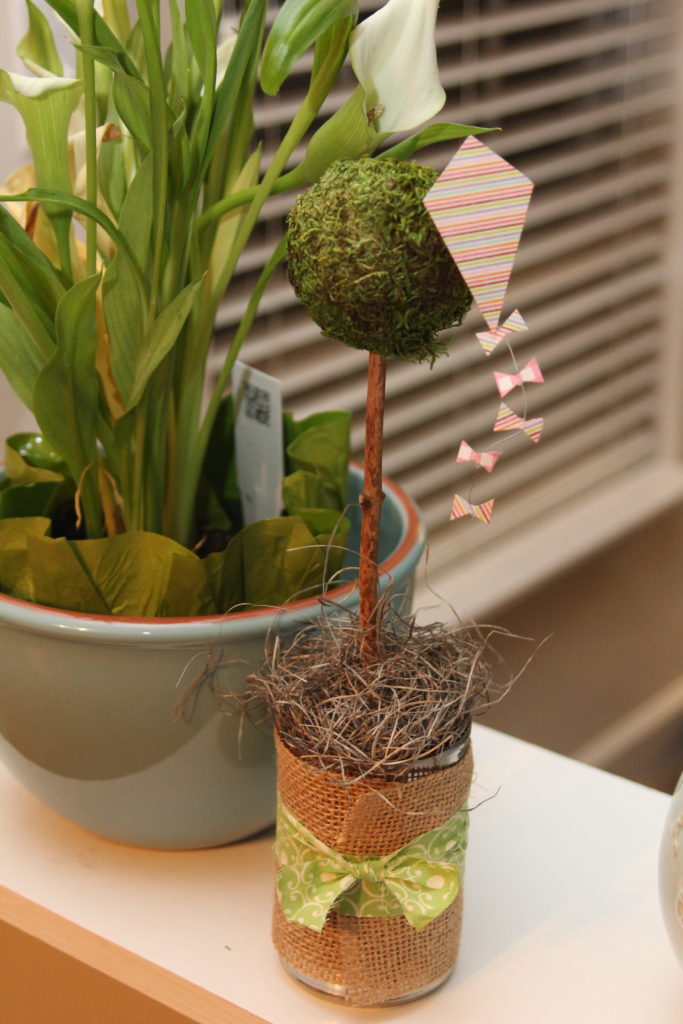
Step 8: Gaze in wonder and the magnificence of your amazing talents. Or…turn it around and around like I did and go…hmmm…what’s missing? Yeah, that moss ball is a little small. How about a kite?

No tutorial on the kite today…I’ll just tell you what I did and let you figure it out. I cut out a kite shape from a scrap piece of scrapbook card stock. I cut out five little bows from the same page. I stripped the paper off of two twisty ties and glued the kite and bows to the wires. The wire attaching the kite to the tree I cut in half after it was glued so it wasn’t too long. I also used a straight pin to puncture the moss ball first because the little twisty wire is too flimsy and just bends when you try to push it in.
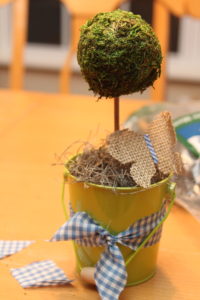
Then I made another one. It’s a little different. The bucket was from the dollar section at Target umpteen months ago. The dowel was shorter, I didn’t have a mug plug so I used a Styrofoam ball I had from trying yet another way to do this project, and cut the bottom off of it so it would fit inside the bucket flat on the bottom. I stuffed the Spanish moss into it and didn’t glue it. I cut out a butterfly shape from the tidbits of burlap I had left, wrapped another twisty tie around the butterfly and stuck the end down into the moss. I glued the blue gingham to the back of the bucket and tied it in the front. Boom!
I have two more of these in tin cans, one has two moss balls on one dowel and I like that one a lot. There are a lot of containers and embellishments that could be done with this. I think a tea cup with a topiary would be super cute too.
Any questions?
Awww, super cute! Seeing as how I need to empty half of my belongings from my house, I won’t be adding cute things like this any time soon. But maybe next spring after we’ve moved on and sorted everything out 🙂
Ooooh Amy, wouldn’t it be cute with a small print of a bumble bee in black right on the burlap? Some white ribbon on the stick instead of the burlap and maybe a tiny bee on the moss ball. I could so see that sitting on top of a piano. Not sure why but when I think of one for you, that’s what I think of. Maybe I’m WAY off, but I just saw it in your soon to be not your living room.
By the way…where are you going to move?
Well, I happen to *love* bees. But the piano is going to another home since we’re way past the two years we originally agreed to have it. Not that I really mind, I like playing it but I already have a piano…in Birmingham.
Speaking of Birmingham…kidding, I shouldn’t even pretend we’re moving there. We’re staying in Franklin. We could get more house for less $$$ in Spring Hill but Franklin is our home and I don’t plan on leaving- ever.